Before you jump into crabbing in a big way, there are a few things you should examine and make decisions on. These few things can save you both time and money in the long run.
Crabbing can be both a fun and expensive sport. If you can narrow down your preferences and understand the pro’s and con’s as well as associated costs it can keep you focused and help you make informed decisions.
Important Reminder:
Please do your part to reduce whale entanglements by paying special attention to Chapter 3, Rigging your crab lines, “LINE WEIGHTS”, and chapter 2, “WEIGHTING POTS”.
These best practices will greatly reduce the chances of whales entangling themselves in floating line and pots that walk, tangle with more pots, then cause a major trap for marine mammals.
If you see an entangled whale please call 1 877 767 9425 (877 SOS WHALe), Take pictures, record location, time and direction of travel.
Shallow vs. deep water crabbing
Do you plan to crab in 60-70’ of water or less? Or, are you planning to crab in water in the 100-250’ range?
Generally, the shallow water crabbing will be a little less expensive. You don’t need as much line, and the Danielson pots (see Figure 1-1 below) work just fine. If you are doing deep water crabbing you should probably consider the heavier round “commercial type” gear (see Figure 1-2 below). This gear will be about twice as expensive as the Danielson sport pots.
I have both types of gear and usually run the Danielson pots in 150’ of water or less, and the round gear in 150’ and greater. This is just my preference; both will catch crab in shallow or deep water if rigged correctly.
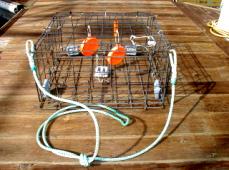
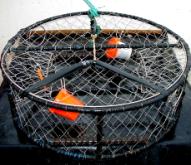
Figure 1-1 Danielson crab pot Figure 1-2 Round “commercial type” crab pot
Day soaks vs. extended day soaks
Do you plan to drop your pots in the morning, fish for the day, then pull your pots and bring them home with you? Or, do you plan to do multi-day soaks?
On short soaks of a day to over night, the Danielson pots will out fish the round gear. The Danielson’s have 4 openings (one on each side) where the round gear will have either one or two openings depending on the size of the pot. With 4 openings, the Danielson’s have more of a chance for the crab to get caught. The down side is the Danielson’s tend to leak crab faster once the bait stops “milking”.
So, generally speaking if you are doing short soaks of a day to overnight, the Danielson’s will be your better bet. Longer soaks however, will produce better with the round gear. Because they have fewer openings and the openings are slightly ramped in an upward direction they tend to leak far less than the Danielson’s.
I run both Danielson’s and round gear but can not get out on a daily basis because I work full time. Early in the season when the crabs are most plentiful the Danielson’s will produce on a multi-day soak, but as the crab stock diminishes there comes a time where the catch rate falls low enough that it’s not worth fishing them more than a day at a time. When it reaches that point I pull my Danielson’s and concentrate on the round gear which leaks far less on extended day soaks.
Hand pulling vs. power puller
This is a tough one, and comes down to almost a pure economic issue, unless you are a young buck who is looking for a good workout while enjoying a day on the ocean.
I pulled pots by hand in 150’ of water for several years, then bought an electric puller and will not even attempt to “hand pull” in deep water now. If you plan to crab in shallow water and use the Danielson pots I would recommend hand pulling especially if you run 10 pots or less.
If you want to crab in deeper water and plan to use the round gear I would recommend an electric or hydraulic puller, especially if you plan to run 10 or more pots. Electrics tend to be less expensive and require less room (no fluid pump or reservoir) and run from about $500 to $1,200 new. Occasionally they can be found used but don’t hold your breath.
Another option that some guys do is build their own from a starter motor. It is much cheaper but be sure you know what you are doing with gearing and pulley size. The commercially available electric pullers have taken all the guess work out with reduction gears, torque that matches the job, and disks that are sized for the speed you want to pull.
| Chapter 2 |
Rigging your pots
Rigging can be pretty controversial kinda’ like which is better Ford or Chevy…
There are lots of ways of rigging pots. Some based on logic; some based on personal preference and the way something looks or feels; some because someone was told this was the best way to do it, etc. etc.. Ask around, use logic, watch others and see what works and maybe where there is room for improvement.
What is being described here is what has worked for me. Much of it is from watching, asking questions, listening, asking the all important question “why”, logic, and just plain experimenting.
Rigging Danielson’s (square sport gear)
Danielson pots can be found for about $25-$30 a piece and usually come unrigged with non-weighted doors. These pots are very attractive to the occasional crabber that goes out a couple times a season, because they are designed to collapse into a nice flat square for easy storage.
When they are used in this manner, they are a little wobbly. If you don’t plan to collapse them and intend to use them more regularly then you can make them a little more rigid by using slip jaw pliers to secure and tighten the metal loops that connect the sides to the bottom and top of the pot. In addition, use of plastic “tie wraps” at the corners and top and bottom will also make a more noticeably rigid pot. See figure 2-1 below.
A word of caution when tightening down the metal loops using slip jaw pliers, these pots are made of wire with a vinyl coating. If you cut or nick the vinyl coating the saltwater will attack the bare metal and result in a weak spot in the pot. Generally speaking, if you fish these pots hard (multiple days, most of the season) they will last about 3 years.

Figure 2-1 Danielson pot made more rigid with tie wraps
You will also see a round escape ring on the top of the pot. These rings are secured with string. DO NOT USE WIRE OR TIE WRAPS TO PERMANTLY SECURE THE RING. We’ll discuss the why in another section below.
These rings are designed to allow the undersized crabs to escape. The rings are sized to keep the legal size crabs in and allow the “shorts” to escape.
Rigging round pots (commercial type gear)
These pots come in multiple sizes from 26” to 36’ with the 28’ and 32” the most popular in the sport community. The 28” pots weigh about 28 lbs each and the 32” pots about 35 lbs. Each manufacturer has slightly different specs and prices. Generally, figure about $85 for an unrigged 32” pot and about $125 for a fully rigged pot (line, buoy, bait jar, zinc, rotten cotton, line weights).
These pots are usually welded from commercial re-bar and wrapped with thin strips of rubber inner tube, with the screen hand woven using stainless steal wire. These pots are much sturdier than the Danielson’s.See Figure 2-1A.

Figure 2-1A. Round pot under construction
You will also notice the escape rings on the round gear are slightly larger, and “secured” to the pot. We’ll explain that in a section below.
Weighted doors/un-weighted
When you look at the doors on the Danielson’s and round gear, you will see they are very different. We’ll discuss both one at a time and some tips for each.
First the Danielson’s- the doors that come with the traps are non-weighted. The non-weighted doors will open and close in the tidal surge. This is an open invitation for the crabs to leak out. You should either buy weighted doors (about $6 for a package of 4 doors) and install them, or make your own. I usually modify the ones that come with the pot by buying rubber core slip sinkers and remove the rubber core, slide the sinker up the door leg (one on each leg of the door) and crimp it to the door with a vice. See Figure 2-2.
Another precaution that is helpful is to make the door hinge a little larger and more round. Many times when the doors come from the factory, they bind a bit. I take a large round shaft screwdriver and place it in the hinge part of the door, then take a rubber hammer (so it doesn’t nick the vinyl, remember that?) and mold it in a nice round shape so it doesn’t bind. See Figure 2-3.
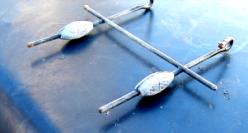
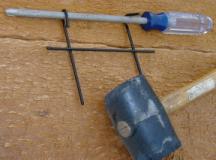
Figure 2-2 Rubber core sinkers on doors Figure 2-3 Rounding the door hinge
If you look at the doors on the round gear, you will see they are a little different than the doors on the Danielson’s. The tunnel (the entrance up to the door) is slightly sloped and you will notice the door is also angled back a little to the outside of the pot. These design features are significant. The angle slightly back, helps keep the door closed and doesn’t require weighting like the Danielson’s. In addition, there is a little drop from the door to the bottom of the pot, while the Danielson is flat with the base of the door.Dungeness do not like to climb (so I’m told), so these two design features are a large part of why they don’t leak as much in comparison to the Danielson’s. See Figure 2-4.

Figure 2-4 Door and sloping tunnel
Bait jars vs. hanging bait
Here’s another area that can be controversial.
The reason behind baiting a crab trap is to lure crabs into the pot. You want the scent to milk out of the trap and provide a trail for the hungry crabs to follow. The longer your bait milks and sends out scent, the longer your traps will continue to lure crabs. It’s pure logic.
Have you every taken a fish carcass and lowered it into the water in a harbor and timed how fast it disappears? It’s amazing how fast one gets completely eaten. There are tons of really tiny creatures that seem to come from no where and just devour it.
Now, think of a plastic bait jar that has small slits that make it really hard for these tiny creatures to get through. Your bait is much less likely to be eaten and will remain in a state that can milk for a longer time.This is a good thing.
In the beginning I use to crab with a bait jar and a hanging bait. What I found was that I caught a pretty good number of rock crabs in with dungies. Then I found when I didn’t have hanging bait available to me and fished just the bait jar, I caught fewer rock crabs and more dungies.
Now I fish two bait jars in each pot and hang them with plastic tie wraps so they will swing in the tidal surge and help the milking process. See Figure 2-5.

Figure 2-5 Two bait jar set up
What I’ve found is that squid is a good short term bait and milks pretty quick. Oily fish like anchovies, herring, mackerel, etc. will milk slower and not go sour as fast. (NOTE: dungies like fresh bait, not rancid bait like what is used for lobsters back in New England.)
So, the reason I use two bait jars is to put a fast milking bait in one jar to attract the crabs, and a slower milking bait to keep them in the pot, and a continued milking stream to keep the pot “fishing” longer.
Another thing I like to do is keep the bait frozen and put “chunks” in the jar. If you keep it frozen then as it is lowered to the bottom it will milk less on the way down. You want to keep as much of the scent in the bait as possible, till it reaches bottom. I’ve seen guys thaw their bait in a bucket of water and fill jars with bait that has already lost much of its’ scent in the water it was thawed in.
Name tags
If you are not using these inexpensive little tags, you better go order some.
You’ve probably seen them on commercial pots at the harbor. They are small orange tags that you can have your name, phone number, CF number, etc print on and hang in your pot. I’ve gotten a couple of pots back from these small orange tags, they do work. I hang them in an obvious location using a plastic tie wrap. See Figure 2-6.


Figure 2-6 Crab pot with hanging name tag
I ordered a large quantity of them a few years back from a supplier of commercial lobster gear in Maine.Their name is:
TOP-ME Tags
74 Orion Street
Brunswick, Maine 04011
207 449 1180
At the time, the tags were 18 cents each with a minimum order of 50, plus UPS charges. Give them a call, if you get one lost pot back as a result, you will save the cost of your tags.
Bridal’s
For those new to crabbing, the bridal is the rope on the pot that the float line attaches to.
Danielson’s and the round commercial gear are rigged differently. The round gear has a single connection point bridal, where the Danielson’s are usually connected to multiple corners of the pot.
Most folks rig their Danielson’s with a pyramid shaped bridal, connecting it to the four corners on the top of the pot. I rig my Danielson’s a little different, more like the style the New England lobstermen use, by connecting the bridal in two parallel corners forming a “V” shaped bridal. I also attach the bridal by braiding the line to the pot rather than using a knot. It looks a little neater and you don’t have a knot that can fail.See Fig 2-7.
I’ve found rigging this way, the bottom front of the pot tends to “dig in” a little and not walk as much, as long as you have the correct scope and don’t “over buoy” the trap. I’ve had pots rigged this way go through several back to back substantial storms and not walk.

Figure 2-7. Danielson rigged with a “V” bridal
While rigging Danielson’s this way has worked for me, there is a down side that I want to be sure you are aware of. If you have the pots rigged this way and set them in a north/north west wind, then get a sudden south/south east wind and the pot doesn’t have opportunity to gradually turn itself with the wind and current, then it can “turn turtle” and be left on its back with the doors open.
Rigging the bridal on the round gear is pretty simple, but there are a few small things that I can suggest.First, make your attach point opposite the side you empty your catch from. This keeps the bridal and rope out of the way when baiting and emptying the pot. The second thing is to attach the bridal at one of the vertical bars that is welded to the bottom and top of the pot. The idea is to tie the knot to the top of the pot with enough trailer to make a second knot and run the trailer down the length of the vertical bar. Then, using stainless steel crabbers wire (the same stuff that is used to weave the pot) make several turns around the line and the vertical bar then twist the ends together with pliers until it snugs up nicely. Do this above and below the knot on the vertical bar. If you rig this way you won’t lose a pot to a bridal slipping. See Fig 2-8.

Figure 2-8. Round gear bridal
One last note on bridals- I leave a large loop at the end of the bridal to attach the float line. You’ll see why when we discuss rigging the float line.
Weighting pots
This is a simple one, especially for the round gear. Generally speaking, if you are crabbing in 300’ or less the pot builder has probably made them heavy enough to hold them down if you are using the correct line and do not “over buoy” the pot. If you want to add more weight use more construction rebar to add weight and either weld them in along side the other rebar, or (less desirable) wire tie them in. I have 32” Bettencourt “Franko Specials” that weigh 35 pounds and have not moved when fished in 200’ of water.Information on these pots can be found at the following URL: http://sportcrabpots.com I highly recommend them.
The Danielson pots do not come weighted. Every year there are unfortunate folks who fish them as is, with no additional weight and lose their pots. Generally speaking 12-14 pounds of extra weight should be sufficient if you have the float line and buoy correct. For weight you can use: rebar; lead fishing weights; bricks; dive weights; or any number of dense objects. The objective however is to find something that doesn’t take up a lot of room, and will attach easily and be out of the way.
I use lead dive weights because they are very compact and can be easily attached to the bottom sides of the Danielson’s using plastic tie wraps. See Figure 2-9.

Figure 2-9. Danielson pot with dive weights
Zinc’s
Zinc’s are used as an anode just like on an outdrive, rudder or trim tab. Sacrifice the zinc to electrolysis rather than your pot. Also, the commercial crabbers will tell you that crabs can detect electrical charges and will try to avoid pots with a charge, that’s an additional reason they use zinc’s. The zinc’s come in two forms, spin on (threaded to spin on a stud mounted on the rebar weight) and tie on, using stainless steel wire. I use the tie on type in my round gear and connect it between the tunnel and escape ring. See Figure 2-10 and Figure 2-10A.
Danielson’s on the other hand are vinyl coated and don’t need zinc’s. I suppose one could add them by cutting two slots in the vinyl and attaching the tie on type, but I’m not sure I would try it. I’ve been running Danielson’s without zincs for years and have continued to have very good success.


Figure 2-10 Tie on type zinc Figure 2-10A Tie on zinc on pot under construction
Rotten Cotton
If you lose a pot because the float line got cut or some other reason, you don’t want the pot to be able to fish forever like gill nets. You want the pot to be able to disable itself if lost. I mentioned earlier not to hard wire the escape rings in on the Danielson’s, that’s the reason.
On the Danielson pots you should be using something the commercial crabbers call “rotten cotton” to tie your escape rings in, or to hook escape door closed. The rotten cotton is pure cotton string that will rot over time and drop the escape ring thus disabling the pot. I believe Fish and Game requires you to have a mechanism to make the pot disable itself if lost. Rotten cotton is considered the standard for doing this. See Figure 2-11. Beware, do not use nylon or poly to do the same thing. Yes, it will eventually decay, but after a much longer period of time.Fish and Game does not consider this acceptable.
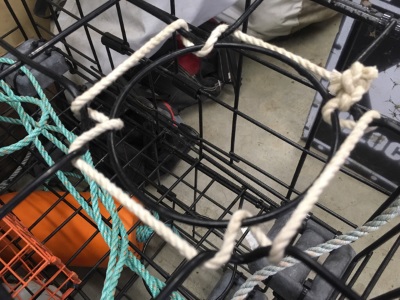
Figure 2-11. Danielson pot with “rotten cotton” tied escape ring
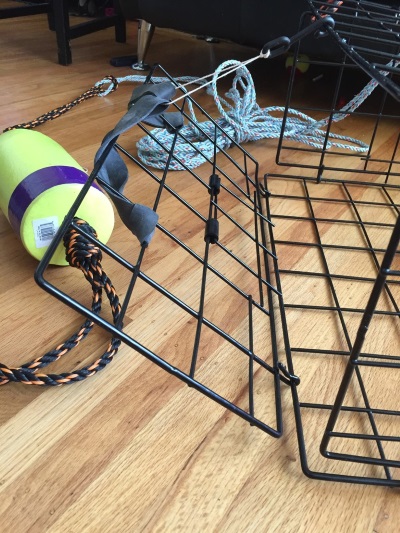
Figure 2-11b.
On the round gear however, you will notice the escape rings are hard wired into the pot with the stainless steel wire webbing. On the round gear, the rotten cotton goes on the locking mechanism between the rubber and the hook. If the pot is lost, the rotten cotton decays and allows the pot top to open thus disabling it. See Figure 2-12.

Figure 2-12. Round gear with rotten cotton on latch system
An aside, you will notice the escape rings on the round gear are slightly larger than the Danielson’s. This is to allow crabs under the 6.25” size (commercial grade minimum size) to escape. This is the reason you hear people say they tend to get larger crab in the round gear. It’s because the smaller sport size crabs have more opportunity to escape.
| Chapter 3 |
Rigging your crab lines
If you don’t get this right, you can lose your pots…
There are a number of important factors in rigging your lines. Scope, line weight and line diameter being the most important.
This is another one of the facets of crabbing where there are a lot opinions, likes and dislikes. What I’m going to describe is what I like and has worked for me. Trust me, there will be contradicting views, so experiment a little and use what works for you.
Line type/diameter
There are lots of line options here that will work. This one pretty much comes down to preference and what works for you. Some use “truckers’ rope”; poly, nylon; Blue Steel crabbers’ rope; you name it and it probably has been used. My preference is Blue Steel crabbers’ rope. I like a stiffer rope and once it’s been used a few times I find it coils just fine. I just find (for me) the stiffer rope is easier to work with.
Line diameter is important. You want the smallest profile you can have, to lessen drag and lessen the chances of something snagging the line (kelp, large jellies, etc.) and dragging the pot. I use 5/16” Blue Steel which has a minimum tensile strength of 1,850 pounds. I can’t imagine needing anything stronger. The 5/16” line also has substantially less drag in the water, which helps keep your buoys afloat during a strong current. There is nothing more frustrating than being at your string and either not seeing your buoys or seeing them for 5 seconds every 30 seconds because they are being pulled down by current. Small diameter line can make a difference in keeping buoys afloat.
Line scope
Line scope and buoy size are probably the biggest mistakes beginning crabbers make.
This one is real simple. If you don’t have enough scope on your line, your pots will walk and you will lose them! Especially if you are doing more than a daytime soak. Many suggest adding 18-20% to the actual depth to get enough scope. I prefer to go a little higher on the percentage to be safe. I use 25% as a good rule of thumb. My 200’ string of round gear gets 250-260’ of line. I’ve found this to be about right for the gear I fish.
Line weights
Many lines will float. With the extra scope you need to allow for tidal movement and current, you can have line floating at slack tide. This is a bad thing. You don’t want to be responsible for a fellow boater screwing up an outdrive or prop because you had 50’ of line floating on the surface. Not to mention, losing your pot in the process.
So, weight your lines to keep them hanging almost straight down from your pot. Lots of methods can be used, but I use crabber weights (about 4 oz. each) and braid them into the line. Take a 6-8” piece of Blue Steel and unravel it into its’ 3 strands. Then take a splicing fid and work a little less than half of the length of one of the strands into the main crab line in an “over-under” fashion. Then slide a crabbers weight over the loose end and repeat the “over-under” weave on the other side with the loose end. This should give you a nice neat installation that will also work well with a power puller. See Figure 3-1.


Step 1 Step 2


Step 3 Step 4
Figure 3-1. Crabber weight braided in main line
How many weights do I need, and at what intervals? I put my weights 15-20’ apart starting from the buoy down to the point on the line that matches my depth. So, if I’m in 200’ of water and have 250’ of line, I’ll put weights every 15-20’ from the buoy to the 200’ mark (about 3 weights in this example).
Braiding the line
Here’s a simple one that I learned a while ago. You don’t want to be in a rocking boat trying to add extension ropes or replacing a worn line and have knots to untie. Especially knots that are old, compressed from tension over time, and covered with jelly or slime.
What I learned to do was braid loops in each end of the line so I had no knots to deal with when it came to changing or adding line. You simply put the loop of one rope over the loop of the other then pull the first rope through the loop of the second rope. See Figure 3-2.


Step 1 Step 2 Step 3


Step 4 Step 5 Step 6
Figure 3-2. Adding/changing ropes using the loop system
A tip in braiding the loops- always make the “end loop” on a line a large enough loop that you can pull your whole coil of line through all at once. You don’t want to be pulling 200’ of line through a loop a foot at a time. Passing the whole coil all at once is much faster and keeps you from ending up with 200’ of rope on the deck that you have to then re-coil.
So, the sequence and loop size from the pot to the buoy is: 1) bridal loop on the pot is the end of the pot, so it gets a large loop; 2) the main line has a large loop and small loop, the small loop mates up with the large loop on the bridal leaving the large loop at the top or “end” of the line; 3) the buoy has a small loop that goes over the large loop, then the buoy feeds through the large loop on the main line completing the connection. All you have to remember is working from the pot up, the “ends” of everything have a large loop. This will make rope additions, rope changes, and buoy replacements a snap in a rocking boat.
| Chapter 4 |
Rigging buoys
This can be a fun job and allow the creative artist in you to emerge…
Most beginning crabbers don’t realize how important the buoy is in keeping your pots. The general tendency is to “over buoy” the pots, allowing them to walk. This happens so many times (especially early in the season), and then the stories of pot thieves begin Nine times out of ten, the buoys have walked and have not been stolen.
In a sense, the buoy kind of works like the drag washer on a reel. It allows your crabbing system to “give” when it needs to, by allowing your pot to be pulled underwater without lifting the pot and allowing it to walk.
Buoy Type & Size
For the type and weight of the gear we “sporties” use, the 5” X 11” buoys are just perfect. If you don’t over weight your line, this type buoy will hold the line on the surface (assuming scope is correct), yet allow the buoy to submerge in heavy currents or storms.
Another reason to not over buoy the pot is catch rates. Think of a pot sitting on the bottom milking its’ bait, enticing the crabs to enter. Now, think of a pot that is over buoyed and with each wave the pot is lifted off the bottom an inch or two then hits the bottom again. Which pot do you think will have the higher catch rates?
How many times have you seen gallon Clorox bottles or antifreeze bottles used for buoys? These are far too buoyant. I have to believe the pots are lifting off the bottom and banging down again. Spend the couple of bucks for a buoy that was designed for this purpose and you will most likely see a difference in catch rate.They are also less likely to snag floating debris.
Another controversy is single or double buoys. Both have their benefits and draw back. Two buoys will make it easier to spot your string, especially if your trailing buoy is a bright florescent color. However, two buoys will give you more buoyancy (which can be a bad thing) and it gives kelp paddy’s and other debris more chance to grab the rope and chalk one up for the pot thieves. Personally, I think debris in the water claims many more pots than pot thieves.
Another plus and a big minus for single buoys is, if a buoy gets demolished by a prop the double buoy set up has a “back up”. In 9 years of doing this, I’ve gone out to pull pots that were double buoyed and only two times found a single buoy remaining.
I use to double buoy my pots, but as I add new pots to my gear I use single buoys and have lost less gear.
Marking the buoys
It is now a law to mark your GO ID # (found on your fishing license), on each buoy. It helps lessen the mistake of someone accidentally pulling someone else’s pot (how many blaze orange un-painted pots have you seen out there?). And in the off chance that a thief does take your pot, F&G may catch them in a check at the launch ramp. F&G will compare GO ID #’s on buoys to fishermen on boat.
The best way I found to mark my buoys is to use a ¼” broad tip soldering gun and burn my CF numbers into the buoy before I paint them. The burned in numbers are pretty hard to miss, and impossible to simply paint over and hide. Once they are painted, they show up very clearly. See Figure 4-1.

Figure 4-1. Unpainted buoy with CF numbers burned in
Painting the buoys
Buoys are painted to differentiate one crabbers gear from another. Be creative and have fun designing your own buoys with creative colors and patterns. But don’t over do the design. If you have a very intricate design it could take more time than you want to make a set of matching buoys for a string.
What kind of paint? If you are doing short soaks, most any kind of paint will do. However if you are doing extended soaks and want the paint to last, I would suggest using buoy paint that is designed for this purpose. I’ve been using Humboldt Treasures Vinylon buoy paint and ordering it from Seattle Marine. It runs about $23 a quart. It’s pretty expensive but lasts longer than other types of paint. It’s also a paint with a lot of fumes (but gives a nice vinyl finish) so be sure and do your painting in an area with lots of ventilation. The first time I used it, I was painting in my basement and started getting a little light headed.
A tip for painting and drying your buoys. Take a wire coat hanger and keeping it whole, bend it so the double portion will fit inside the hole in the buoy. You then have something that you can hold on to and turn while painting, and it comes with a ready made hook to hang it up to dry. See Figure 4-2.

Figure 4-2. Buoy with coat hanger inserted
Colors are another controversial topic. If you want to be stealth and keep all those pot robbing thieves away, use dark colors that blend in with the water. Just remember, if it’s harder for a robber to see them, it will be just as hard for you and your crew.
I tend to use two colors and make a band around the pot by using the color of the float. Simply use 2” masking tape and wrap it around the buoy and paint on either side. Then when you remove the masking tape you have a two-colored buoy with a colored stripe. See Figure 4-3.

Figure 4-3. Finished buoy with float colored stripe
I like to us a bright fluorescent color on one end of the buoy and white on the other end. Many people don’t like to use white because it’s harder to spot in whitecaps. But when there are no whitecaps, white shows up extremely well. So my logic is, I’m doing this for sport so I’m less likely to be out there in nasty weather with whitecaps. On those days when whitecaps do come up while I’m pulling, I still have the bright fluorescent color on the other half, as my color of reference.
Numbering buoys
Ever pulled pots in the fog, and pulled the same pot twice thinking it’s the next one in your string? I have, and that’s why I now number my buoys. I have a spreadsheet that I keep, that has a waypoint for each buoy, and the number of the buoy at that waypoint. This method lets me keep track of which buoys I’ve pulled and not pulled (I mark each pot as it’s pulled), and it also lets me keep a catch record for each pot. So, if I do some experimenting I can easily see over the season if the experimental pot catches better or less than the other pots.
To number the buoys, I burn a number in the end of the buoy the same time I’m burning in my CF numbers.Then when I paint the buoy, I paint the number with a contrasting color so I can see it easily in the approach. See Figure 4-4.

Figure 4-4. Finished buoy with number on end
Attaching line to buoys
I set my buoys up so they can be changed in and out very quickly. You never know when you will find a damaged buoy and need to do a quick change. That is why I braid loops in all the lines so changing buoys, lines, and adding extension lines is quick and easy.
I’ve found about 6.5’ of line is about right for the line to rig a buoy. I start from the back of the buoy and work forward. First thing I do is double the line back about 18-20” and do an overhand knot as far back as possible on the double end of the line. Then do a second one snugly against the first. This is the knot that is at the end of the pot and holds the pot on the line.
Then taking the single end of the line, run it through the hole in the pot (from the back end of the pot out the front end) and pull the tag end of the double line inside the hole in the pot. From the front of the pot pull the line as snug as you possibly can and tie another overhand knot as snug as possible at the front of the pot. You now have a knot at the front and back of the pot.
With the remaining line, make a loop and braid it back to the main line. Working from the back of the pot to the front in this manner will give you a nice neat buoy that can be changed in and out very easy. See Figure 4-5.

Figure 4-5 Finished buoy with braided loop
| Chapter 5 |
Setting your pots
You’ve done all the hard work, now it’s time to enjoy the hunt…
What I’m going to describe in this section is what has worked for me, and the “system” I’ve tweaked over the years on my boat. There are many ways to set your pots, don’t be afraid to experiment and try different options and develop a “system” for your boat.
Selecting a location
If you are targeting dungeness crabs you want to be on sandy or muddy bottom. Stay away from sandy locations near rocks or you will attract rock crabs. I did this in my first year of crabbing figuring the crabs go into the rocks in stormy weather. I caught more rock crabs in my first year of crabbing than dungeness.Later I found during storms, the dungies dig into the sand or mud and wait out the storm.
Another tip a commercial crabber told me but I can’t verify, is that if you can find a sandy/muddy spot with a good drop off, set up on the high spot, that the crabs will follow the slops as they move in and out. I did this for a couple weeks one year at a sandy spot on the west end of Deep Reef. I did pretty well, but the depth and current were a bit too much for my sport gear.
Once you select a location on the chart, when you get there check for other gear in the water and be considerate. Don’t “cork” anyone who is already there, give them plenty of room. Also don’t cross another persons’ string. Crabbers usually lay their gear in a line. Try to determine which way their string runs and try to honor their string. I usually pick a spot to begin my drop and mark it on my GPS, then run south east from there to check for other pots before I drop (I run my pots north west to south east with the prevailing winds). If I don’t find any conflicting strings, I’ll go back to the GPS location and begin setting my pots.
Dragger lanes- beware
You may not be aware, but there is a gentleman’s agreement between the halibut draggers and the commercial crabbers. Every year thousands of dollars of crab gear was lost to drag nets, and thousands of dollars of damage was done to drag nets. So, the draggers and crabbers came to an agreement that the draggers would have a designated lane to drag in and the crabbers would not set gear in the lane.
There is a designated lane off Pillar Point that starts 3 nmi off shore and ends 4 nmi off shore. This lane pretty much follows the coast up to the entrance to the Golden Gate. Before setting gear, become familiar with the drag lanes in area you plan to crab. See Figure 5-1.
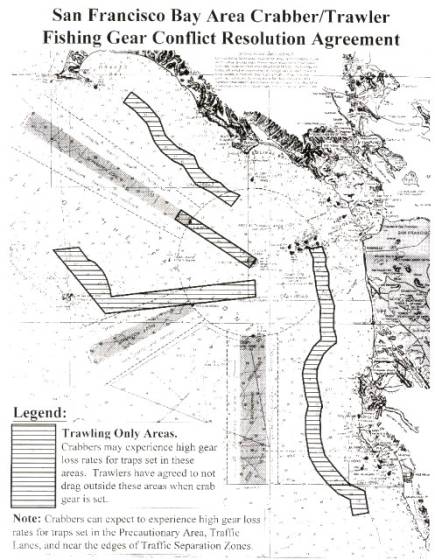
Figure 5-1 Bay Area drag lanes
How to lay the string
To make your life easier, don’t randomly drop your pots. Finding and pulling your pots is so much easier if you have a nice straight string. Since the majority of time winds in our area blow north west to south east, when I’m laying a string I’ll use the wind to set my drift and drop from north west to south east. This will give me a nice straight string, and let me space them so I can see one buoy from the next buoy.
When you take your line and buoy out of the pot to deploy it (assuming you store the line and buoy in the pot) pull off about 3’ of line from the end with the buoy and place it away from the rest of the coil then lay the coil on the deck so the top of the coil is the end that attaches to the pot. The reason for getting the buoy away from the coil, is your chances of fouling the line are much greater if the buoy is in the middle of your coil. The reason for laying the coil on the deck with the pot side up is pretty obvious. If you have it reversed, the rope will be pulling off the bottom of the coil as you deploy the pot. That’s one sure way to foul the line.
When it’s time to drop the pot, you want the bridal facing you as you drop the pot. Remember, if you are dropping north west to south east, you want the bridal facing the down wind direction. Toss the pot overboard and hold one hand directly over the coil on the deck and the other hand overboard, and let the line feed itself. If you don’t kick or disturb the coil, it will uncoil without fouling every time.
Marking pot locations
This may seem obvious but I want to mention it anyway. Don’t drop your pots and not mark them in your GPS, even if it’s for a partial day soak. You may be dropping them in clear sunny conditions, but may have to pull them in a thick fog. How many times have you left the harbor with relatively clear conditions and then have fog settle in?
Waypoint & buoy number
Like I mentioned earlier, I keep a printed spreadsheet on the boat that I fill in as I deploy the gear. The spreadsheet has cells for a buoy number and waypoint, and cells for recording the catch each day I pull pots.
Before I deploy a pot, I record the buoy number, then when the pot is deployed and buoy goes over the side, I mark it in the GPS and write down the waypoint number next to the pot number in my spreadsheet.
I also write down the Lat and Lon locations of the first and last pot in the string (I record it on my spreadsheet) so I have a written record of the actual beginning and end of the string. If you have boat problems and need to pull with a friend in their boat, your waypoints are not going to work on their boat.You can simply punch in the numbers for the beginning of your string and go right to it, with no guessing.
| Chapter 6 |
Retrieving your pots
Now the excitement begins, waiting, waiting, waiting to see “color” in your pot as it approaches the surface…
You’ve done all your homework, decided on gear, done all your rigging, selected “your spot”, and set your gear. Now the fun begins. Did you select a spot that is holding dungies, did all the gear work properly, will I have crab for dinner tonight? I still get butterflies in my stomach the night before an opener, and can’t wait to see “color” in the pots as they come up.
Where to start pulling
There are different schools of thought on this one. Some say start with the down wind pot and pull up hill, others say start with the furthest pot so if weather comes up at the end of the string, you have a shorter run home.
My suggestion is to let the sun and glare determine your pull sequence. If the sun or glare is on the water, I’ll start pulling from the end of the string where the sun is at my back. To me being able to clearly see my buoys (and other crabbers buoys so I don’t “cork” them) is important to me. If you are pulling into the sun and glare it can be very difficult to see your buoys and other crabbers buoys.
If it’s an overcast day with no glare, I’ll pull in an up hill direction. So, if the wind is coming out of the south I’ll start at the north end of the string and pull in an up hill fashion. If the wind is out of the north, I’ll start with my south end of the string and pull up hill into the wind.
Approaching the buoy
It’s a good idea to approach the buoy from behind in an up hill direction, for two reasons: 1) If you don’t have your line weighted correctly you could have some line floating just below surface that could get tangled in your prop; 2) approaching from the back of the buoy let’s the person hooking the buoy pull in some slack line to work with, where approaching from the front of the buoy you immediately have the full weight of the buoy to contend with.
Grabbing the buoy
This is actually pretty simple. Use a docking pole, gaff, or custom made pot hook, anything that will let you grab the line in front of the buoy. Many folks frown on using a gaff and say they ruin the buoys. I’ve used a gaff for years and have yet to injure a buoy, plus it lets me keep things simple by not having a gaff and a pot hook on board.
To grab the line, I try to pick out a spot a few inches in front of the buoy (the line will be shallow here) and go a little past the line and rake down and in, kind of like you would use a rake in a garden.
Pulling by hand
I pulled by hand for a few years in 150’ water and found you can use the rocking of the boat to your advantage. I would get the buoy in the boat then run parallel with the line taking in as much scope as possible being very careful of the line direction and location of the prop.
Once I had the slack out and was pretty much over the pot, I would position the boat so I was beam to the swell so the boat rocked more. Then I would pull on the crab line as the boat rocked toward the line, and hold the line to the rail as the boat rocked to the other side. This let the rocking of the boat actually do the “heavy lifting”.
Coiling the line is almost impossible in this scenario. What I found is that if you didn’t kick or move the line in your pile (rather than coil) it will deploy just fine nine times out of ten as long as you keep a hand directly over the pile (at a ninety degree angle) as you feed the line to re-deploy the pot.
Power pulling
I’ll start by describing how I have the gear set up on my boat, and hopefully it will make it easier to understand how it all works.
I use an Electra-Dyne electric puller with a ¾ hp motor, 20:1 reduction gears and 10” disks. This unit will pull 100 lbs at 290 feet per minute with an amp drain of 36-45 amps. See Figure 6-1. Electra-Dyne can be found at the following URL http://www.electra-dyne.com/start.html
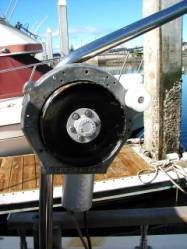
Figure 6-1 Electra-Dyne pot puller
I also have the puller mounted on a davit that I can swing overboard when I’m ready to pull, and have it set up to operate with a foot switch, leaving my hands free to work the line. The foot switch is simply a plywood box that a windless deck mount foot switch is installed in. See Figure 6-2. The davit base has multiple holes to adjust the angle of the davit. Determine the angle you want the davit, line up the holes, and secure with a 5/16 stainless bolt and wing nut (for easy release). What I also like about this setup is that I can sit on my engine hatch, work the puller switch with my foot, and not have to worry about balancing while standing up pulling the pot. See Figure 6-3.
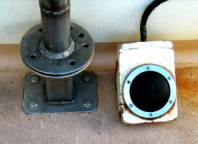
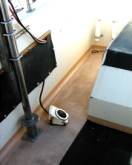
Figure 6-2 Davit swing out base and foot switch Figure 6-3 Set up to sit and pull
The block that I use (pulley the rope goes through) snaps on an eye at the end of the davit. I have a 4” blockwith a 2,000 lb capacity. See Figure 6-3. This block is made by Hydro-Slave. Information can be found at:http://www.midcoast.com/~marinhyd/hydroslav.html See Figure 6-4.
With this block and davit setup, I found when running to my string the block would slam against the davit.A simple solution that I found to stop this, was to run my stern dock line from the cleat, down the inside of my rail and up to the block, then through the base of the block and back down through the rail to the cleat.See Figure 6-5. This held the block firmly in place while running and wasn’t in the way while pulling the pots.
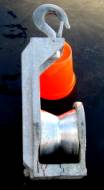
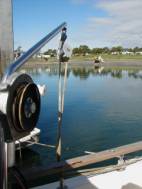
Figure 6-4. 4” Hydro-Slave block Figure 6-5 Block with dock line attached
To make things simple, I set up the davit and block at the dock before I leave the slip. Simply because it’s easier to do it at the slip than in a rocking boat out at my string. When I reach my string, I’m ready to pull.
When a buoy comes over the side and into the boat, the rope goes over the block first, then under the Fairlead roller (white roller) on the puller, then over the disk. The Fairlead roller puts a little tension on the rope which makes the disks “bite” better.
Once the rope is in place on the block and the Electra-Dyne, I can sit on the engine hatch push the switch with my foot and just guide the line to the base of the davit where the line coils up nicely. When the bridal hits the block, I take my foot off the switch, stand up and grab the pot and simply swing it around and place it on top of the engine hatch which becomes my work platform for baiting and measuring.
Measuring crabs
Be sure you have a measuring device on board for measuring your crabs. See Figure 6-6. The minimum size that can be taken sport crabbing is 5.75” measured inside the points on the end of the shell. See Figure 6-7.
Once you have sorted out your “keepers”, put them in your holding container and immediately write down the number you kept from the pot. As mentioned earlier, I keep a spreadsheet on the boat so I can keep a catch record on each pot. Write the number of keepers down before you do another thing. You want to keep an accurate count of the number of crabs in your keeper at all times. I usually have one person on the crew responsible for keeping an accurate count. The last thing you want to do is lose count of what’s in your container and have to take 35-40 crabs out and put them on the deck for a recount. Remember, Fish and Game will ticket you for even one over, even if you tell them it was a mistake and will throw it back.

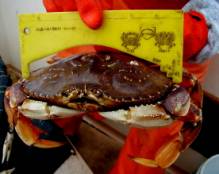
Figure 6-6 Well used crab measuring device Figure 6-7 Measuring “inside the points”
While it is legal for sport crabbers to keep females (commercials can not), everyone is encouraged to return them to the water. One female can carry thousands of eggs to replenish the resource. Let’s keep the resource healthy and return the females.
Once you are good at this, you can tell the difference between males and the females simply by looking at the shape of the shell, but this takes some practice. The sure fire way is to look at the flap on the bottom underside of the shell. The males have an elongated triangle shaped flap, while the females have a broader based, shorter flap. See Figure 6-8.


Female crab Male crab
Figure 6-8
Checking for “softies”
After the crabs molt and begin the process of developing a new shell, their shell can be somewhat soft for quite a while. These are called “softies”. You should always check for “softies” and if you get one, return it to the water. Softies have very little meat in their cavities because they have not “grown into” them yet, and the softies are not as flavorful. So, if you get a big one, throw it back and take a smaller one with a good hard shell. You will be happy you did.
There are two ways to test for softies. Pinch the large knuckle on the biggest leg, or pinch the shell under the claw (that’s how the commercials do it). If it is not hard and tends to squish a bit, you have a softie. A word of warning, if you do the pinch test under the claw be very careful. These crabs can deliver a nasty bite and draw blood.
Holding the crabs
Like I mentioned above these guys can give a nasty bite. There are two ways to hold them. Thumb under the shell on the “flap”, and fingers on the top of the shell. See Figure 6-9. The second way is by making a circle with your thumb and index finger around the two hind legs of the crab. See Figure 6-10.


Figure 6-9 Thumb on flap hold Figure 6-10 Hind leg hold
Also a note of caution, when you are taking the crabs out of the pot- beware of crabs that are under the crab you are trying to pick up. The majority of time when people get bit, it’s by a different crab than the one they are attempting to pick up. Many times, the one under it is the culprit.
Rebaiting
I think baiting was covered pretty well in Chapter 2, “Bait Jars vs. Hanging Bait”. The key points are keep the jars clean, and keep the bait frozen so it doesn’t milk until it thaws on the bottom.
Also, some crabbers recommend not throwing your old bait that’s left in the jars, back in the water. Put it in a bucket and bring it inshore and dump it. Don’t feed the crabs you are trying to lure into your pots.
Check before dropping pot
With both the round gear and the Danielson’s, there is a check list you should get accustom to going through before you re-deploy a pot.
On the Danielson’s:
1) Check to make sure all doors swing properly, they can jam
2) Check your rotten cotton and replace it if necessary
3) Check that weights are still secure replace tie wraps if necessary
4) Check tie wraps on bait jars for ware and replace if necessary
5) Check name tag, if missing add new one
6) Check buoy for ware and line fray, replace if necessary
On the round gear:
1) Check doors, ling cod can get in pots and jam the doors as they force their way out
2) Check your rotten cotton and replace if necessary
3) Check your zinc’s and replace if necessary
4) Check the rubber strips for deterioration and replace if necessary
5) Check tie warps on bait jars and replace if necessary
6) Check for name tag, if missing add new one
7) Check buoy for ware and line fray, replace if necessary
Clothing/Accessories
There are a couple of items that can be useful when pulling pots. Whether you hand pull or power pull, you may benefit from:
1) A good set of bibs. Crabbing can be wet and messy, especially later in the season when growth begins forming on the buoys and ropes. If you plan to power pull you should consider having a good set of bibs, a pretty good amount of water can come off the puller.
2) Glasses- be very careful of jellyfish tentacles on the rope, especially if using a puller. Small pieces of jelly can fly off the rope and puller and sting like hell if it gets in your eyes. I’ve gotten it in the corner of my eye a couple of times and it can be painful.
3) Gloves- mainly because of the jelly. If jelly hits your skin it will burn. I use the long sleeved rubber crabber gloves to cover my arms because I usually pull in a tee shirt and want the coverage for my arms. See Figure 6-11. Short rubber gloves will work fine if you have long sleeves on.
4) Small kitchen brush to clean out bait jars and quick scrub buoys.

Figure 6-11 Long sleeved rubber crabber gloves
| Chapter 7 |
Resetting the pot
Little things can make a difference…
Resetting the pot is not as simple as just throwing it overboard when it’s rebaited. There are a few things that can be done that will make a difference.
Where to re-drop
To make your life easier and those crabbing around you, keeping your string in a straight line lets you and others around you know where your next pot should be. This helps minimize crossing of strings and “corking” another crabber by mistake.
As mentioned earlier, I usually run my strings north west to south east so I have a nice straight string in our normal north west wind pattern, and mark each pot with my GPS. I also space them just close enough that I can see the next pot in the string from the location of the pot I’m pulling.
So, when I re-drop I run toward the next up hill buoy in the string and run about .03 km past the GPS mark for the pot I’m dropping, turn the boat stern to the wind and drop the pot. Re-dropping with the wind/current will have the buoy facing the correct way when the pot hits bottom. Also running about .03 km past your GPS mark to begin your drop, will put you very close to the original location by the time your pot hits bottom.
How to toss the pot
This one is very simple. If you are dropping with the wind (south east direction in a north west wind) toss the pot over the side of the boat bottom side down, with the bridal facing the same south east direction.This will keep everything in alignment till the pot hits bottom and the line will be correctly set for the current wind direction.
Feeding the line
This was mentioned before but merits a repeat. If the rope is coiled on the deck and has not been disturbed (kicked, flipped over, etc.) it will feed out the same way it coiled as long as the line continues to come directly off the top of the coil. So, hold the line in one hand over the side, and the other hand directly over the coil and just let the line run through your hands while you simply guide it. The important part is keeping the hand directly over the coil!
| Chapter 8 |
Crab care & handling
You’ve done all the work, been successful, so don’t make mistakes now that can ruin your catch…
There are a few simple things that you can do that will guarantee your crab stay fresh and are the best quality. After all this work, you don’t want to stop paying attention to detail now.
Keeping them alive onboard
Wind and sunlight are the biggest enemy of the crab, followed by being left in a cooler full of water that does not get replenished.
If you don’t have a way of keeping a fresh supply of water in a holding tank, crabs will stay alive several hours in a waterless cooler with the lid shut. They won’t be quite as lively when you hit the dock, but they will have plenty of kick to draw blood from an unsuspecting finger. As you get a keeper put it immediately in the cooler and close the lid. If they are in the wind and sunlight they will dry out and die quicker.
A mistake that many beginning crabbers make is to throw a bucket or two of sea water in a 100 qt cooler and put 10-20 large crabs in it and leave it that way till they get home. Most times, they will be dead if it’s more than a couple hours. What happens is they use up all the available oxygen in the water and suffocate themselves. So, if you do put them in water, make sure you can replenish it frequently.
I have what I call a “poor mans” live tank on my boat. I took an old 160 qt cooler, removed the top, and built a ½ plywood insert that fits flush with the top of the cooler. See Figure 8-1. I then used a hole saw to cut two holes in the plywood, one for a water inlet, and one for an outlet. I placed the water inlet hole under the connection for my wash down hose and put an ordinary plastic garden hose “Y” valve on it so I can either use the wash down hose or fill the live tank. See Figure 8-2.


Figure 8-1. 160 qt “poor mans” live tank Figure 8-2. “Y’ valve and electric outlet for bilge pump
Next, I rebuilt an old bilge pump and placed it in the corner of the tank under the water outlet hole and ran an outlet hose from bilge pump over the side of the boat. I then ran an electric line from my breaker panel to an outlet at the live tank so I could plug in the bilge pump, and tied my wash down pump and the bilge pump together at the helm with a single pole, double throw switch.
With this set up, I can fill and drain the live tank directly from the helm. Just flip the switch “up” and the wash down pump kicks in filling the tank. Flip the switch “down” and it pumps the water overboard.
I try to change the water about every 15-20 minutes. What I’ve found is the crabs are very feisty when we hit the dock, just ask the couple of crew members that got bit this year.
Transporting crab
Here’s another simple one. When you are ready to pack up and head home with the catch, just remember to use the same principles as above and add some ice to keep them cool.
I have my crew bring a cooler with blue ice, and an old bath towel. We put all the towels in a bucket of sea water (don’t use fresh water) and let them soak while we divide up the now feisty cooler of crabs. Do you know what 50 commercial size crabs in a 160 qt cooler look like when they are all agitated with hands grabbing at them? Think about it, that’s 100 snapping claws in a confined area.
Hint: if the crabs do start to get agitated in the keeper cooler or the individual coolers, simply close the lid, make it dark and they will settle down pretty quickly. This will also save substantial broken claws and legs.
Once you have the catch divided up, take the sea water soaked bath towels and place them on top of the crabs in the individual coolers. Then put the blue ice on top to slow their metabolism. If you follow this procedure, the crabs will stay alive (you want them to be alive when you cook them) for several hours. I have a guy who crabs with me occasionally that comes down from Sacramento, it’s got to be at least three hours before he’s home and has water boiling to cook the crab, and he tells me they are always plenty lively when he “makes the drop”.
So, in transporting them it’s the same principles as keeping them alive on the boat. Keep them moist, out of the sun, and out of the wind.
Cooking the crab
You want to cook the crab as soon as you can. Once they die, they start to quickly build up toxins that can make you sick. So, make sure your crab are alive when you cook them. If in doubt, throw them out!
Most people boil their crab, but I prefer to steam mine in beer, Old Bay spice (See Figure 8-3.), a handful of garlic cloves, and a couple of bay leaves. I have a large pot (with a steamer insert) that will cook up to 15-20 crabs, that I put 10-12 cans of cheap beer in along with the spices, then bring to a full boil with the cover on.

Figure 8-3. Old Bay spice
Once at a full boil I quickly drop the crabs in and cover the pot and watch for it to come back to a full boil (lots of steam coming out from the cover). Once it returns to a full boil, I set the timer for 18-20 minutes depending on the size of the crab; how fast it’s boiling; and how many crabs I have in the pot.
The reason I steam them rather than boil them is, logic tells me in boiling, some water will run through the shell and draw out some of the flavor, where steaming they cook in their own shell without water diluting the flavor. My logic may be off, but the crabs still taste damn good. I never had anyone send one back to the cook.
While the crabs are steaming, I fill one side of the kitchen sink with cold water. When the crabs are done, I bring them inside (I cook them outside on a very large propane burner to keep the smell and mess down in the house) and quickly remove them from the steamer and plunge them in the cold water to stop them from cooking any more. This also makes it much easier to handle them in the cleaning process.
Leave them in the cold water about 5 minutes or till they are cool enough to handle, then drain the sink and let them sit for a while if you want. You are now ready to start the cleaning process.
Cleaning the crab
Here is another simple one, just follow the pictures and you can’t go wrong.
First turn the crab on it’s back with the flap up. See Figure 8-4. With your index finger, pull the flap up and break it off. See Figure 8-5.


Figure 8-4 Crab on back with flap up Figure 8-5 Breaking off the flap
Turn the crab over so it is right side up and looking down at the back of the shell, use your thumbs to separate the shell from the body in one firm motion. See Figure 8-6 and 8-7


Figure 8-6 Thumbs positioned to remove shell Figure 8-7. Removing the shell
Once the shell is removed, pull off the gills that run along both sides of the body. See figures 8-9 and 8-10.


Figure 8-8.Removing a set of gills Figure 8-9. All gills removed
Next step is to remove the viscera and any remaining non edible parts. Just use your fingers and run them down the center of the crab and give the crab a quick rinse. See Figures 8-10 and 8-11.


Figure 8-10 Removing viscera Figure 8-11 The finished product
You are now ready to serve them with some garlic butter, cocktail sauce, or whatever you prefer. Another option is to chill them and serve them cold, personally I think they are a little more flavorful if chilled.
| Chapter 9 |
Sources for crab gear
Having a clue of where to go for specific gear can be a real time saver…
When I first started crabbing, long before all the information sharing on Coastside Fishing Club, it was difficult to know where to go for what supplies. The references below are the ones that I’ve used with success. There are other suppliers out there, these are just the ones that I’ve found and have been happy with. Hopefully, this resource list will be useful to you.
Item Source
| Round crab pots (Bettencourt Franco specials) | http://sportcrabpots.com/ |
| Danielson crab pots | Hi’s Tackle
Gus’s Discount in S.F |
| Crab rope | Seattle Marine http://www.seamar.com/indexb.html |
| Bait Jars | Seattle Marine http://www.seamar.com/indexb.html |
| Rotten Cotton | The Gear Store- Princeton |
| Line Weights | The Gear Store- Princeton |
| Buoy Paint | Seattle Marine http://www.seamar.com/indexb.html |
| Buoy’s | Seattle Marine http://www.seamar.com/indexb.html |
| Rubber strips | Seattle Marine http://www.seamar.com/indexb.html |
| Door hooks | Seattle Marine http://www.seamar.com/indexb.html |
| Puller foot switch | http://www.westmarine.com
Item: 289365 |
| Long sleeve crabber gloves | Seattle Marine http://www.seamar.com/indexb.html |
| Bibs | Seattle Marine http://www.seamar.com/indexb.html |
| Plastic name tags | TOP-ME Tags 74 Orion Street Brunswick, Maine 04011 207 449 1180 |
| 4” block | http://www.midcoast.com/~marinhyd/hydroslav.html |
| Electra-Dyne pot pullers | http://www.electra-dyne.com/start.html |
| Boiling/steaming pots | http://www.shop-maine.com/lobpot/chp_body.asp
Items: UD-511957
UD-514050 |
